


The most reliable way to attribute offline sales in Google Ads is to capture the GCLID at the point of click, persist it through your CRM, and upload it via Data Manager or the Google Ads API while running enhanced conversions for leads alongside it as a backup match path. Done properly, this gives you campaign-level visibility on which clicks actually turned into revenue, and it feeds Smart Bidding the signal it needs to stop chasing cheap leads that never close. Before anything else, check that auto-tagging is switched on and that you have a conversion action set up for imports from clicks.
TL;DR:
- GCLID capture must happen immediately upon landing and be stored in hidden form fields to ensure accurate offline conversion matching.
- Using enhanced conversions for leads as a fallback captures cross-device and expired GCLID cases, but is less reliable for long sales cycles.
- Offline conversions must be uploaded within 90 days of the click, with a strict focus on proper timestamps, order IDs, and deduplication for accurate reporting.
- Data Manager is the recommended upload method for most advertisers, while API or CRM connectors suit high-volume or existing system integrations, all requiring hashing of PII.
- Regular testing, diagnostics, and error monitoring are essential to maintain accurate tracking, especially after website changes or form redesigns.
Table of Contents
- What are offline conversions in Google Ads and why bother sending them?
- How Google matches offline events to ad clicks
- Setting up offline conversion tracking: your step-by-step checklist
- Which upload method should you use: Data Manager, API, or a connector?
- How long do you have, and when will it show up in reports?
- Fixing common offline conversion import errors
- A practitioner’s rollout order for retail ecommerce
- If you’d rather have someone build this for you
- Where to check the details yourself
- Sources
What are offline conversions in Google Ads and why bother sending them?
Offline conversions are the sales, bookings, or qualified leads that happen away from your website. A phone order, a showroom sale, a deal a sales rep closes three weeks after the initial enquiry. None of that shows up in your Google Ads account automatically, because Google can only see what happens on your site or app.
That blind spot is expensive. If your Google Ads reporting only counts an “add to basket” or a form fill as a conversion, you’re optimising towards the wrong outcome. A campaign that generates lots of enquiries but few actual sales looks fantastic in Google Ads and terrible in your bank account. Sending offline conversion data back into the platform closes that gap. It tells Google, in effect, “this specific click, three weeks ago, turned into a £4,000 order.” That’s the signal Smart Bidding needs to start finding more of the same.
Google itself now steers advertisers towards a specific implementation path rather than the older, more fragmented offline import methods. It recommends starting with enhanced conversions for leads and has folded enhanced conversions into a single unified setting that accepts data from website tags, Data Manager, and API connections. That consolidation matters if you’ve been putting off migrating an older CSV upload process. The old method still works, but it’s no longer the path Google is building for.
How Google matches offline events to ad clicks
GCLID matching is deterministic. When someone clicks your ad, Google attaches a unique Google Click Identifier to the destination URL. Capture that ID when the visitor lands, store it against their record, and send it back with the conversion later, and Google matches it exactly. There’s no probability involved and no guesswork. This is the highest match rate you’ll get, provided the GCLID survives the journey from click to CRM to upload without getting dropped.
Enhanced conversions for leads works differently. Instead of relying on a click ID, it uses first-party data, an email address, phone number, or name, hashed with SHA-256 before it ever leaves your servers, and matches it to a signed-in Google Account. This is the safety net for the cases GCLID matching misses: a visitor who clicked on one device and converted on another, or a GCLID that expired before the deal closed.
The two methods aren’t rivals. Run them together and you get overlapping coverage:
- GCLID capture for the highest-confidence, click-level match, ideal for shorter sales cycles where the lead closes within weeks.
- Enhanced conversions for leads as the fallback that catches cross-device journeys and recovers matches when a GCLID has expired, though it’s worth treating as a recovery layer rather than a guaranteed fix for long sales cycles.
- Order ID as your deduplication anchor, so re-uploading the same sale twice doesn’t inflate your numbers.
- Conversion date, not click date, determines which reporting period the sale lands in, which matters when you’re reconciling monthly figures against your CRM.
Where this breaks down is predictable. A GCLID that’s expired by the time the deal closes won’t match. Hidden form fields that were supposed to carry the GCLID through to your CRM but got dropped during a website redesign will silently kill your match rate. And hashing errors, capitalising an email address differently at capture versus upload, for instance, will cause enhanced conversions to fail quietly rather than loudly. None of these show up as a dramatic error message. They just show up as a lower number of imported conversions than you expected, which is exactly why the GCLID capture mechanics deserve proper attention before you build anything on top of them.
Setting up offline conversion tracking: your step-by-step checklist
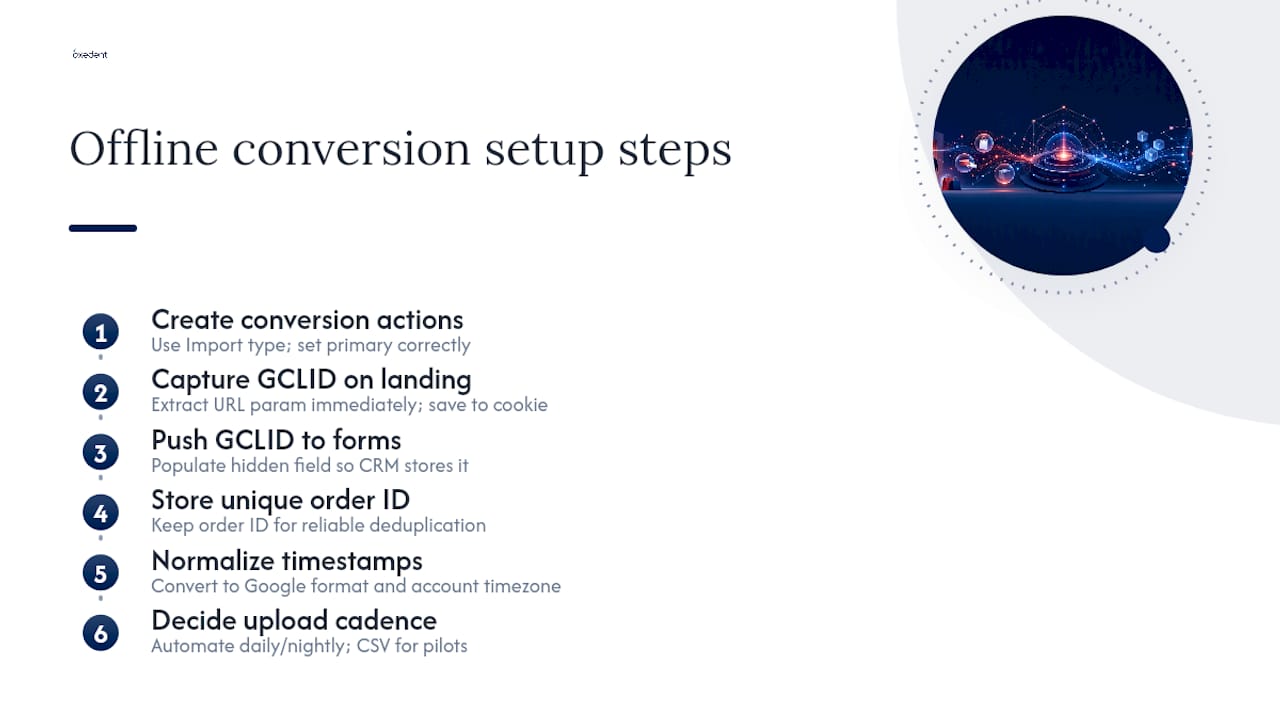
Once you understand the two matching paths, the implementation itself is mechanical. Here’s the order that avoids the most common false starts.
1. Create your conversion actions first.
In Google Ads, set up one or more offline conversion actions using the “Import” type, sometimes still labelled UPLOAD_CLICKS or “import from clicks” depending on which part of the interface you’re in. If you’re tracking multiple stages, an initial lead and a later closed sale, create separate actions for each and decide carefully which one is primary for bidding purposes. Getting primary versus secondary wrong is one of the quieter mistakes that skews Smart Bidding: if your secondary, low-value action is accidentally set as primary, you’ll optimise towards enquiries instead of revenue.
2. Capture the GCLID the moment someone lands.
A short script on your landing pages needs to pull the gclid parameter from the URL the instant a visitor arrives, before any redirects or tracking consent banners have a chance to interfere. Store it in a cookie or localStorage so it survives if the visitor browses several pages before converting.
3. Push the GCLID into every relevant form.
This is where most setups quietly fail. The GCLID needs to travel from that cookie into a hidden field on your enquiry form, your quote request, your callback booking, whatever the entry point is, so that it lands in your CRM attached to the lead record itself. If your CRM only stores the customer’s name and email, you’ve lost the one deterministic link back to the ad click.
4. Store a unique order reference for deduplication.
Every offline conversion you eventually upload needs an order ID or an equally unique reference tied to that specific sale. Without it, re-uploading data, correcting a mistake, backfilling a missed week, will double-count conversions that Google can’t tell apart. Google’s API documentation is explicit that order IDs are the reliable basis for deduplication when reconciling ad platform data against CRM records.
5. Normalise your timestamps before anything goes near an upload file.
Conversion date and time need to be in a format Google Ads accepts, and the time zone needs to match what your account expects. A sales team logging deal closures in local time while your Ads account is configured for UTC will create conversions that appear to have happened before the click that generated them, which Google will simply reject.
6. Decide your upload cadence and lock it in.
Daily or nightly automated uploads are the practical standard for any business generating steady volume. Manual CSV uploads are fine for a one-off backfill or a small pilot, but they don’t scale, and they’re the first thing that gets forgotten when someone goes on holiday.
Pro Tip: Run a single test conversion through the full pipeline before you switch on automated daily uploads. Fake a GCLID, push a test lead through your form, manually trigger the “close” in your CRM, and watch it appear in Google Ads. If it doesn’t show up correctly on a test run, it won’t magically start working at volume.
The general conversion setup fundamentals are worth revisiting at this stage too, particularly if your account has several conversion actions already competing for attention.

Which upload method should you use: Data Manager, API, or a connector?
Four practical routes exist for getting offline data into Google Ads, and the right choice depends on your engineering resources and your volume, not on which one sounds the most sophisticated.
Data Manager is where Google is directing most advertisers now. It’s the unified home for enhanced conversions, supports an SFTP connector for advertisers migrating away from legacy flat-file uploads, and it’s the option most marketing teams without a dedicated developer should default to. If you’ve been running an older CSV process for years, this is the natural upgrade path rather than a rebuild from scratch.
The Google Ads API using the uploadClickConversions method and the ClickConversion schema is the route for teams with engineering capacity who want tight control. Each conversion object needs the conversion action, the conversion date and time, user identifiers where relevant, and ideally an order ID for deduplication. For high volumes, batching multiple conversions under a single job ID makes the resulting job summaries far easier to debug when something goes wrong.
CRM-native connectors and middleware, think Salesforce or HubSpot integrations, or server-side tools that push webhook data through to ad platforms, sit in the middle. They’re the right choice when you already run your sales pipeline through one of those systems and don’t want to build a custom API integration. Server-side approaches also tend to hold up better where browser-level pixel blocking is degrading match rates on client-side tags.
Zapier and similar no-code connectors are the fastest way to get something working, and they’re genuinely useful for smaller teams without developer support. The trade-off is real: connectors like Zapier introduce mapping and latency issues that a direct API integration avoids, because you’re relying on a third layer to correctly interpret your data schema.
Whichever route you choose, one rule doesn’t bend: PII must be normalised and hashed with SHA-256 on your own server before it goes anywhere near a Google endpoint. Sending raw personal data, even briefly, even through a “secure” connector, is not an acceptable substitute for hashing it yourself first.
A quick comparison, because the trade-offs are easier to see side by side:
| Upload path | Best for | Main trade-off |
|---|---|---|
| Data Manager | Most advertisers, especially migrating from CSV | Newer interface, some learning curve |
| Google Ads API | High volume, developer resource available | Requires ongoing engineering maintenance |
| CRM connectors | Teams already standardised on Salesforce/HubSpot | Limited to what the connector supports |
| No-code (Zapier) | Small teams, fast setup | Mapping errors and upload latency |
One detail that trips up otherwise careful implementations: Google’s API documentation warns against combining external attribution data or custom variables with conversions that carry user-provided data for enhanced conversions. Mixing the two can get the conversion rejected outright rather than partially processed.
How long do you have, and when will it show up in reports?
Timing catches out more offline conversion setups than any other single factor, mostly because the windows are shorter than people assume.
Offline conversions uploaded more than 90 days after the associated ad click won’t be imported at all, full stop. Enhanced conversions for leads have an even tighter window in some upload flows, closer to 63 days, so a long B2B sales cycle that regularly runs past two months needs a deliberate strategy, not an assumption that the data will simply arrive late but still land.
A few practical rules to build your process around:
- Deduplication runs on GCLID plus conversion name plus conversion time as the unique key, so re-uploading the same record with a slightly different timestamp can create a duplicate rather than an update. Use order ID as your reliable safeguard against this.
- Reporting latency sits at roughly three hours from upload to appearing in your account, according to Google’s own guidance, so don’t panic if a batch doesn’t show instantly.
- Use the “All conv. (by conv. time)” column, not the standard conversions column, to check whether your upload actually landed against the date you expected. The default column reports by the date Google recorded the conversion, which can differ from the sale date you assigned.
- Consistency beats volume. If you want Smart Bidding to actually use these offline signals, upload regularly and assign accurate values every time, not sporadically whenever someone remembers.
Aligning your import level, whether you’re uploading at MCC or individual account level, with however your existing conversion tracking is structured prevents the quiet fragmentation that comes from the same sale getting counted in two places.
Fixing common offline conversion import errors
Most import failures fall into a handful of repeatable categories, and diagnosing them is faster than most teams expect once you know where to look.
1. CLICK_NOT_FOUND. The GCLID you’re uploading doesn’t match anything in Google’s records, usually because it’s expired, was captured incorrectly, or belongs to a different account than the one you’re uploading to.
2. Invalid conversion action type. You’ve pointed the upload at a conversion action that isn’t configured for imports, often because someone reused an existing web conversion action instead of creating a dedicated import action.
3. Conversion date precedes the click date. A time zone mismatch between your CRM and your upload file, or a CRM logging deal closure in local time against a UTC-configured Ads account.
4. Expired lookback window. The sale happened, but it happened more than 90 days after the click (or beyond the shorter window for enhanced conversions), so the record is rejected outright rather than flagged.
Google Ads surfaces most of this through its offline data diagnostics and, for API uploads, through job summaries that log warnings against each batch. Checking these regularly, rather than only when a client asks why conversions look low, is what separates a monitored pipeline from one that’s quietly been broken for six weeks.
Pro Tip: Run an end-to-end test roundtrip monthly, not just once at launch. Push a fake conversion through the full chain, capture, CRM, upload, and confirm it lands correctly. Then reconcile your CRM’s “closed-won” count against your imported conversion count for the same period. Setups are considered reliable when the two figures align within roughly 10%; a bigger gap than that means something in the chain is leaking.
Beyond individual test runs, build a habit of monitoring error rates over time rather than treating each upload as a one-off. Log every batch, note the rejection count, and set an alert if warnings start climbing week over week. A pipeline that worked perfectly at launch can degrade silently after a website redesign shuffles your hidden form fields, and nobody notices until the monthly numbers look strange. If your account has a history of conversion tracking inconsistencies, a proper tag and conversion audit is usually faster than trying to debug it column by column.
A practitioner’s rollout order for retail ecommerce
Most ecommerce teams try to build everything at once, and that’s usually why offline conversion projects stall. A phased approach gets you a working, if incomplete, signal within days rather than a perfect system that never ships.
Phase 1 is an audit, not a build. Look at what’s already tagged, identify which funnels genuinely produce offline-attributable sales (phone orders, trade accounts, showroom visits), and decide which conversion actions actually matter for bidding before you write a single line of capture script.
Phase 2 is deterministic capture. Get the GCLID landing script live, wire it into your CRM through hidden form fields, and validate with a handful of test payloads before you trust it with real customer data.
Phase 3 is automation. Move from manual CSV to Data Manager or the API, switch on enhanced conversions for leads as your safety net, and start watching diagnostics weekly rather than only when something feels wrong.
Phase 4 is where the real value shows up: reconciling imported figures against CRM data and feeding accurate conversion values into Smart Bidding. This is an ongoing process, not a milestone. Sampling windows and attribution behaviour shift as your sales cycle and product mix evolve, and the accounts that keep improving are the ones that keep checking.
— Biplab
If you’d rather have someone build this for you
Everything above works if you have the engineering time and the patience to test it properly. Not every ecommerce team does, and that’s precisely where a specialist partner earns its place: A specialist partner can handle the tag audits, CRM wiring, and automated import setup so your Smart Bidding gets accurate revenue signals without your marketing team learning the Google Ads API from scratch.

A specialist ecommerce paid media agency treats offline conversion tracking as infrastructure that directly affects return on ad spend, rather than as a side project bolted onto a generalist retainer. That’s a meaningfully different starting point from a general digital agency squeezing conversion tracking in between social media reporting and email campaigns.
If your team has the capacity to run the checklist above yourselves, do it, the steps hold up regardless of who implements them. If you’d rather hand off the audit, the CRM integration, and the ongoing diagnostics monitoring, Oxedent’s ecommerce PPC management service covers exactly that, alongside the wider campaign work that turns clean offline data into better bidding decisions. The sensible next step is requesting an audit of your current setup to see where your conversion data is actually leaking before you commit engineering time to fixing it.
Where to check the details yourself
Google’s own documentation is the definitive source once you’re past the planning stage, and it’s worth bookmarking rather than relying on secondhand summaries. Start with the offline conversion imports overview for the unified enhanced conversions setting, then the import guidelines page for lookback windows and reporting latency specifics. Developers implementing via API should work directly from the uploadClickConversions documentation for schema and batching detail. For a lighter-weight connector approach, Zapier’s guide to offline conversion uploads shows a common no-code integration pattern worth understanding before you rule it out.
Sources
- About offline conversion imports – Google Ads Help
- Upload offline conversion | Google Ads API
- How to Track Offline Conversions from Online Ads (Google + Meta + CRM Setup) – HYROS
- Track offline conversions in Google Ads with Zapier