



Install the Google tag via Google Tag Manager, push product IDs through the dataLayer, link Google Merchant Center to Google Ads, and launch a Display or Performance Max campaign with “use a data feed for personalised ads” enabled. That sequence lets your store show the exact products each visitor viewed and recover sales you would otherwise lose.
Before you start, confirm you have:
- A Google Ads account with admin access
- A Google Merchant Center account with an approved product feed
- Google Tag Manager installed on your site
- A GA4 property linked to Google Ads
- A UK GDPR-compliant cookie consent banner with Consent Mode v2 active
Two signals that tell you it is working:
- Your remarketing audience in Google Ads Audience Manager starts populating within 24–48 hours of tag deployment
- Your first assisted conversions appear in GA4 within the campaign’s first week
Table of Contents
- What is remarketing for ecommerce, and how does dynamic remarketing differ?
- Accounts, prerequisites and UK compliance you need before you start
- How to set up dynamic remarketing step by step
- How to set up standard remarketing lists and campaigns
- How should you segment audiences, set lookback windows and choose bidding?
- What makes a product feed and creative work for dynamic ads?
- How do you measure and optimise remarketing performance?
- Common mistakes, troubleshooting and realistic cost expectations
- When should you hire an ecommerce PPC agency?
- Key takeaways
- Oxedent’s managed remarketing for ecommerce brands
What is remarketing for ecommerce, and how does dynamic remarketing differ?
Remarketing means showing paid ads to people who have already visited your store. For ecommerce, that is the highest-value audience you have: they already know your brand and looked at your products. The question is whether you show them a generic ad or the exact item they left behind.
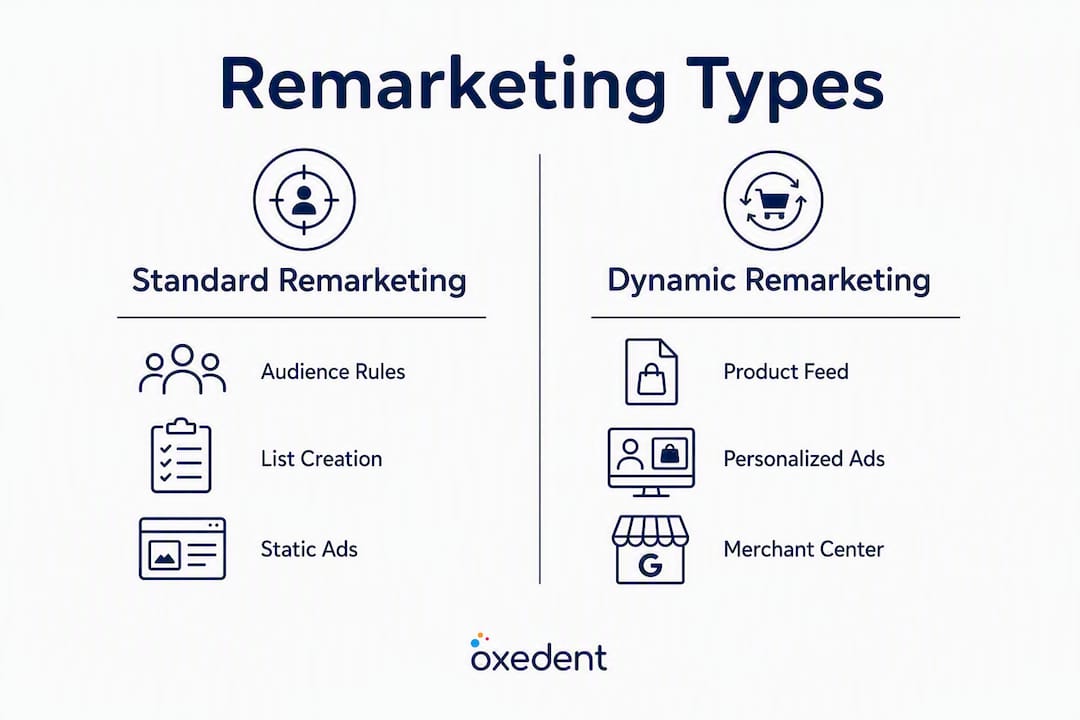
Standard remarketing uses audience-based rules. You build a list (everyone who visited a product page, for example) and show them a creative you designed manually. The ad does not change per viewer. It works well for brand awareness, win-back campaigns, and stores with small catalogues.


Dynamic remarketing goes further. It pulls product images, titles and prices from your Merchant Center feed and assembles a personalised ad for each viewer based on the specific items they browsed. A shopper who looked at a navy running shoe sees that shoe in the ad, not a generic banner.
| Behaviour | Best campaign type |
|---|---|
| Browsed product pages | Dynamic Display or Performance Max |
| Added to cart, did not purchase | Dynamic Display with cart-abandoner list |
| Past purchasers (cross-sell) | Standard Display or customer list |
| High-intent search terms | RLSA (Remarketing Lists for Search Ads) |
| Win-back (lapsed customers) | Customer list via Google Ads or Meta Custom Audiences |
One distinction worth knowing: dynamic prospecting and dynamic remarketing are not the same thing. Dynamic prospecting uses machine learning to find new customers, while dynamic remarketing focuses on converting visitors who already engaged with your store.

Accounts, prerequisites and UK compliance you need before you start
Skipping this stage is the single biggest cause of failed launches. Get these in order first.
Account checklist:
- Google Ads with admin or standard access (billing active)
- Google Merchant Center with a product feed that has passed diagnostics (no critical errors)
- Google Tag Manager container installed on every page of your site
- GA4 property linked to Google Ads via the product link in GA4 Admin
- Merchant Center linked to Google Ads via the “Linked accounts” section in Merchant Center
Technical prerequisites:
- Ability to edit GTM (or deploy a global site tag directly)
- Product IDs on your site that match the
id,item_group_id, ordisplay_ads_idattributes in your feed — this is non-negotiable for dynamic ads - Server-side tagging considered if you run a high-traffic store; it materially reduces measurement loss as browsers restrict third-party cookies
- Accurate
google_business_verticalparameter set toretailfor ecommerce implementations
UK GDPR and consent:
- A cookie consent banner that blocks Google tags from firing until consent is granted
- Consent Mode v2 implemented in GTM so Google can model conversions for users who decline cookies
- A clear privacy policy that names remarketing cookies and third-party ad platforms
- First-party data collection (email capture, loyalty sign-up) as a long-term resilience measure
Linking steps:
- In Merchant Center: go to Settings > Linked accounts > Google Ads and send a link request
- In Google Ads: accept the link under Tools > Linked accounts > Google Merchant Center
- In GA4: go to Admin > Product links > Google Ads and confirm the link is active
How to set up dynamic remarketing step by step
The full sequence: install tag → push events → confirm feed → link accounts → create campaign. Each step below builds on the last.
GTM dataLayer implementation
Your GTM container needs to fire a Google Ads remarketing tag that receives event data from the dataLayer. On product pages, push a view_item event; on the cart, push add_to_cart; on the confirmation page, push purchase. The required parameters for each event include an items array with at minimum id, google_business_vertical, and price or value.

A minimal view_item push looks like this:
dataLayer.push({
  event: 'view_item',
  google_business_vertical: 'retail',
  items: [{
    id: 'SKU-12345',          // must match feed id or item_group_id
    google_business_vertical: 'retail',
    price: 49.99,
    currency: 'GBP'
  }]
});
The id value must match exactly what is in your Merchant Center feed. A mismatch here is the most common reason dynamic ads fail to show product-level creative.
GTM tag and trigger setup
- In GTM, create a new tag: Google Ads Remarketing
- Enter your Google Ads Conversion ID
- Tick “Send dynamic remarketing event data” and map the
ecomm_prodidvariable to your dataLayeritems[0].id - Set
ecomm_pagetypetoproducton product pages,carton cart pages,purchaseon confirmation pages - Create triggers: fire on the relevant page paths or custom events (
view_item,add_to_cart,purchase) - Publish the container and verify in GTM Preview mode
Pro Tip: Use GTM’s built-in variable {{DLV - items}} to pull the full items array rather than mapping individual fields manually. It reduces configuration errors and makes future updates easier.
Merchant Center feed requirements
Your feed needs these attributes as a minimum: id, title, image_link, price, availability, and link. For dynamic remarketing, also include display_ads_id if your site uses a different identifier from the feed id. Use item_group_id to group variants (sizes, colours) so the feed does not churn with every variant change. Run Merchant Center diagnostics and resolve all critical errors before linking to a campaign.
Creating the campaign in Google Ads
- Go to Campaigns > New campaign
- Select Sales as the objective
- Choose Display (for standard dynamic) or Performance Max (for full-channel feed-driven ads)
- Under Additional settings, open Dynamic ads
- Tick “Use a data feed for personalised ads” and select your Merchant Center feed
- Build your audience: add your remarketing lists (product viewers, cart abandoners) as Targeting (not Observation) for a dedicated remarketing campaign
- Set a frequency cap to avoid ad fatigue — a practical starting point is several impressions per user per week
For Performance Max, the feed drives the product creative automatically. You supply headlines, descriptions, logos and images as assets; Google assembles the ad. See Oxedent’s guide to Performance Max for ecommerce for a deeper breakdown of asset requirements.
Debugging checklist
- GTM Preview: confirm the remarketing tag fires on product, cart and purchase pages with correct dataLayer values
- Google Tag Assistant: verify the tag is sending the right Conversion ID and event parameters
- Merchant Center diagnostics: zero critical feed errors before campaign launch
- Audience Manager: check list population after 24–48 hours; lists need around 100 active users for Display ads to serve
- Campaign status: confirm “Eligible” status; “Limited by audience size” means your list has not yet hit the minimum
How to set up standard remarketing lists and campaigns
Standard remarketing is simpler to implement and does not require a product feed. It is the right starting point if your catalogue is small or you are building brand-recall campaigns alongside dynamic ads.
-
Install the Google Ads tag or GTM trigger. If you already have GTM for dynamic remarketing, you can reuse the same container. Create a Google Ads Remarketing tag that fires on all pages (no dynamic event data needed for basic lists).
-
Create your audiences in Google Ads Audience Manager. Go to Tools > Audience Manager > Segments > New segment > Website visitors. Build rules based on URL patterns or GA4 events.
-
Set up your core audience segments with membership durations:
- All site visitors: 30-day window (broad, useful for brand campaigns)
- Product page viewers: 30 days (high intent, good for dynamic and standard display)
- Cart abandoners: 14 days (highest intent; prioritise these)
- Past purchasers: 90–180 days (for cross-sell and win-back; post-purchase remarketing lifts customer lifetime value materially)
-
Create a Display campaign. Select Sales or Consideration objective. Under Audiences, add your segments as Targeting (not Observation). Set bids, frequency caps and a daily budget.
-
For RLSA (Search remarketing). Create a Search campaign and add your audience lists under Audiences > Observation. Apply bid adjustments (typically +20–50% for cart abandoners) rather than targeting only the list. This way you capture new visitors too, but bid more aggressively for known ones.
-
Use GA4 audiences where possible. GA4 audiences can be published directly to Google Ads and tend to be more event-rich than URL-based lists. Go to GA4 > Admin > Audiences > New audience, define the conditions, and publish to your linked Google Ads account.
How should you segment audiences, set lookback windows and choose bidding?
Audience segmentation is where most ecommerce stores leave money on the table. Treating all visitors as one list means your highest-intent cart abandoners get the same bid and message as someone who bounced after two seconds.
Segmentation logic:
- Browse abandoners (viewed product, did not add to cart): 30-day window, lower bid, brand-awareness creative
- Cart abandoners (added to cart, did not purchase): 14-day window, highest bid, urgency-led creative with the specific product
- Checkout abandoners (reached checkout, did not complete): 7-day window, maximum bid, consider a specific offer
- Past purchasers: 90–180 days, separate campaign, cross-sell or replenishment creative
Audience minimums to plan around:
- Display remarketing: approximately 100 active users
- Search (RLSA): approximately 1,000 active users
- YouTube remarketing: approximately 1,000 active users
If your store is new or low-traffic, start with a 90-day lookback window to build list size faster, then tighten it once you have enough volume.
Bidding strategies:
- Target ROAS: use once you have at least 30–50 conversions in the past 30 days; Google needs that signal to optimise effectively
- Target CPA: good for stores with consistent average order values
- Maximise conversions: useful in the learning phase before you have enough conversion data for ROAS targets
- Manual CPC with bid adjustments (RLSA): still effective for Search campaigns where you want precise control over which queries trigger higher bids
Exclusions matter as much as inclusions. Always exclude recent purchasers from acquisition campaigns. Build a separate win-back campaign for lapsed customers rather than mixing them with cold audiences. Sequence your messages: show a product reminder on day 1–3, a social-proof creative on day 4–7, and a time-limited offer on day 8–14 for cart abandoners.
| Campaign type | Audience minimum | Feed/asset needs | Setup complexity | Best for |
|---|---|---|---|---|
| Standard Display | ~100 users | Images + headlines (manual) | Low | Brand recall, win-back |
| Dynamic Display | ~100 users | Merchant Center product feed | Medium | Browse and cart abandoners |
| Performance Max | ~100 users (feed-driven) | Feed + headlines, descriptions, images | Medium–High | Full-funnel, cart and past buyers |
| RLSA (Search) | ~1,000 users | None (text ads) | Low | High-intent searchers already familiar with your brand |
| Customer list | Uploaded list | Email CSV or CRM export | Low | Win-back, cross-sell, LTV campaigns |
What makes a product feed and creative work for dynamic ads?
A dynamic ad is only as good as the feed behind it. Poor feed hygiene produces disapproved ads, mismatched products and wasted spend.
Feed hygiene essentials:
| Attribute | Requirement | Common pitfall |
|---|---|---|
id |
Unique per product; must match dataLayer id |
Variant IDs differ between site and feed |
title |
Descriptive, includes key attributes (colour, size) | Generic titles reduce CTR |
image_link |
Canonical URL, no login required, min 100×100px | Redirected or session-gated image URLs cause disapprovals |
price |
Matches the price shown on the landing page | Price mismatch triggers feed errors |
availability |
in stock / out of stock updated daily |
Stale availability serves ads for sold-out products |
item_group_id |
Groups variants (size, colour) | Omitting this causes feed churn for variant-heavy catalogues |
For image assets in responsive display ads, Google recommends a 1.91:1 landscape image (1200×628px) and a square image (1200×1200px). Keep the main product on a clean background. Promotional text overlaid on images is against Google’s policy for Shopping ads, so keep price and offer copy in the headline and description fields instead.
Ad copy for remarketing:
- Headlines should reference the product category or a specific benefit, not just the brand name
- Use urgency where genuine (“Only 3 left in stock” via feed attribute
quantity_to_sell_on_google) - Responsive display ads allow up to 5 headlines and 5 descriptions; test at least 3 of each
- For cart abandoners, a CTA like “Complete your order” outperforms a generic “Shop now”
Feed testing: run Merchant Center diagnostics weekly during the first month. Maintain a staging feed for major catalogue changes (seasonal repricing, new product lines) and validate it before pushing to the live feed. A broken feed does not just affect Shopping; it takes your dynamic remarketing creative down with it.
How do you measure and optimise remarketing performance?
Launching the campaign is the start, not the finish. Remarketing performance compounds when you measure the right things and act on them systematically.
Core KPIs to track:
- Audience list growth rate: confirms your tag is firing correctly and traffic is sufficient
- CTR: a low CTR on dynamic ads often signals feed quality issues (poor images, generic titles)
- ROAS and CPA: primary efficiency metrics; compare remarketing campaigns against your overall account benchmarks
- Assisted conversions: in GA4, check how many conversions had a remarketing touchpoint that was not the last click
- LTV uplift: track whether post-purchase remarketing cohorts spend more over 90 days than non-retargeted purchasers
Attribution and reporting:
GA4’s data-driven attribution model distributes credit across touchpoints, which gives a more accurate picture of remarketing’s contribution than last-click. In Google Ads, use the Attribution report under Measurement to see how remarketing assists other campaign types. Do not judge remarketing campaigns purely on last-click ROAS; they often assist conversions that get credited to brand search.
Experimentation:
- A/B test creative assets (image vs lifestyle, short headline vs benefit-led headline) using Google Ads’ built-in ad variation tool
- Test audience window lengths: 7-day vs 14-day cart abandoners often show different conversion rates
- Run a campaign experiment to test Target ROAS vs Maximise conversions during the learning phase
Optimisation schedule:
- Day 7: check tag firing, audience population, feed errors, and initial CTR
- Day 21: review ROAS, CPA, frequency, and pause any audience segments with zero conversions
- Day 90: scale budget on winning segments, refine exclusions, and introduce post-purchase campaigns if not already running
Pairing your paid remarketing with email flows through a platform like Klaviyo creates an omnichannel sequence that catches visitors across channels. Remarketing with Klaviyo covers how email and paid ads can work in sequence for cart recovery and win-back.
Common mistakes, troubleshooting and realistic cost expectations
Most dynamic remarketing failures trace back to one of five root causes. Knowing them in advance saves days of debugging.
Top causes of failure:
- Mismatched product IDs: the
idin your dataLayer does not match theid,item_group_id, ordisplay_ads_idin your Merchant Center feed. This is the single most frequent cause of dynamic ads showing blank or generic creative. - Broken dataLayer values: the
itemsarray is empty,null, or fires before the product data loads. Use GTM Preview to inspect the actual values being sent. - Unlinked accounts: Merchant Center and Google Ads are not linked, or the GA4 link is pending. Check Tools > Linked accounts in Google Ads.
- Feed disapprovals: image URLs returning 404s, prices mismatching the landing page, or missing required attributes. Merchant Center diagnostics shows these clearly.
- Insufficient audience size: lists below the minimum threshold (approximately 100 for Display) will not serve. Widen the lookback window or consolidate small segments.
Troubleshooting checklist:
- Open GTM Preview and confirm the remarketing tag fires on product, cart and purchase pages with correct
idvalues - Use Google Tag Assistant (Chrome extension) to verify the Conversion ID and event parameters are reaching Google
- In Merchant Center, check Products > Diagnostics for critical errors and resolve them before the campaign goes live
- In Google Ads Audience Manager, confirm list status is “Active” and population is growing
- Check campaign status column for “Limited by audience size” or “Eligible (limited)” warnings
Timeline expectations:
- Audience build: 24–72 hours for initial population; 1–2 weeks to reach Display minimums for a new store
- Campaign learning phase: 2–3 weeks for automated bidding strategies to exit learning
- Measurable results: expect meaningful ROAS data after 30 days minimum
Budget guidance:
Starting budgets for remarketing are typically lower than prospecting because the audience is smaller and higher intent. A practical starting point for a UK ecommerce store is £15–£30 per day for a Display remarketing campaign, scaling up as audience lists grow and ROAS data accumulates. Remarketing CPCs tend to be lower than prospecting CPCs, but CPA targets should still be set relative to your product margin, not a generic benchmark.
Pro Tip: Do not launch with Target ROAS bidding on day one. Start with Maximise conversions for the first 2–3 weeks to let Google gather conversion data, then switch to Target ROAS once you have 30+ conversions in the account. Forcing ROAS targets too early extends the learning phase and wastes budget.
When should you hire an ecommerce PPC agency?
DIY remarketing is achievable for a single-market store with a clean feed and a straightforward catalogue. The calculus changes quickly when complexity increases.
Practical criteria for hiring a specialist:
- Your monthly ad budget exceeds £2,000 and you are not confident the account is structured to spend it efficiently
- Your product catalogue has hundreds or thousands of SKUs with variants, making feed management and ID mapping time-consuming
- You need server-side tagging, enhanced conversions, or Consent Mode v2 implemented correctly for UK GDPR compliance
- You are running or planning multi-market campaigns with different feeds, currencies or consent requirements
- Your internal team handles other channels and remarketing is getting deprioritised
What Oxedent does:
Oxedent’s work on ecommerce PPC covers the full remarketing stack: GTM and tag setup, Merchant Center feed optimisation, Performance Max builds, managed Display and dynamic remarketing campaigns, and ongoing account optimisation. The agency’s feed-first approach means product ID mapping, variant grouping and feed diagnostics are handled before media spend begins, not after. You can see how that fits into a broader ecommerce PPC structure that scales.
Service differentiators:
- Data-led optimisation: decisions are based on conversion data and ROAS, not impressions or clicks
- Feed-first methodology: feed health is treated as a prerequisite, not an afterthought
- No long-term contracts: month-to-month engagements mean performance has to justify the relationship
For complex catalogues, server-side tagging requirements, or multi-market expansion, the time cost of in-house implementation typically exceeds the agency fee within the first quarter.
Key takeaways
Dynamic remarketing works when product IDs in your dataLayer match your Merchant Center feed exactly, audiences are segmented by intent level, and bidding strategy is matched to your conversion volume.
| Point | Details |
|---|---|
| ID matching is critical | The id in your dataLayer must match id, item_group_id, or display_ads_id in your Merchant Center feed. |
| Consent Mode v2 is required for UK stores | Implement Consent Mode v2 in GTM to model conversions for users who decline cookies under UK GDPR. |
| Segment by intent, not just by visit | Cart abandoners, browse abandoners and past purchasers need separate lists, lookback windows and bids. |
| Start bidding on Maximise conversions | Use Maximise conversions for the first 2–3 weeks before switching to Target ROAS once you have 30+ conversions. |
| Oxedent handles the full stack | Oxedent’s feed-first PPC management covers tag setup, feed optimisation, Performance Max builds and managed remarketing for established UK ecommerce brands. |
What experienced practitioners learn running remarketing for ecommerce clients
The part of remarketing setup that consistently takes longest is not the campaign creation. It is the feed and ID mapping. Stores often have three or four different product identifier formats in play: one in the CMS, one in the dataLayer, one in the Merchant Center feed, and sometimes a fourth in the order confirmation system. Until those are reconciled, dynamic ads either show blank creative or serve the wrong product entirely.
Consent Mode v2 is another area where implementation is frequently incomplete. The banner fires, but the GTM trigger logic does not correctly gate the remarketing tag behind consent. The result is either a compliance risk or a situation where the tag never fires for a significant portion of UK visitors, starving the audience lists.
The practical lesson: spend the first week on feed diagnostics and ID reconciliation before you touch campaign settings. A well-structured feed with clean IDs will outperform a perfectly configured campaign running against a broken feed every time. Once the feed is clean and the tags are verified in GTM Preview, the campaign setup itself takes a matter of hours.
Oxedent’s managed remarketing for ecommerce brands
If you have read this far and the feed mapping, Consent Mode configuration and Performance Max asset requirements feel like a significant time investment, that is a fair assessment. For established ecommerce brands spending £2,000 or more per month on paid media, Oxedent’s managed PPC service covers the entire setup: GTM and tag implementation, Merchant Center feed optimisation, Performance Max builds, and ongoing dynamic remarketing management, all without a long-term contract.

The agency’s feed-first approach means your product IDs, variant grouping and feed diagnostics are resolved before a penny of media budget is committed. You get specialist ecommerce PPC knowledge applied to your account from day one, with reporting focused on ROAS and revenue rather than vanity metrics. If you want to know whether your current setup is leaving conversions on the table, an ecommerce PPC audit is the fastest way to find out.
Official documentation and diagnostics to bookmark
These are the primary sources to keep open while you implement:
- Dynamic remarketing events and parameters (Google Ads Help): the definitive reference for required dataLayer event parameters and items array structure for retail.
- About dynamic remarketing (Google Ads Help): explains how to enable “use a data feed for personalised ads” inside campaign additional settings.
- Dynamic remarketing tag implementation (Google for Developers): covers Google tag and GTM implementation options with business-type-specific guidance.
- Set up a dynamic remarketing campaign (Google Ads Help): step-by-step campaign creation guide including audience minimums and learning phase expectations.
- Dynamic prospecting vs remarketing (Google Ads Help): clarifies the distinction between prospecting and remarketing within Performance Max and Display campaigns.
- Merchant Center Diagnostics (within your Merchant Center account under Products > Diagnostics): the first place to check for feed errors that would block dynamic ad creative.
- Google Tag Assistant (Chrome extension): real-time verification that your GTM tags are firing with the correct parameters on each page type.